
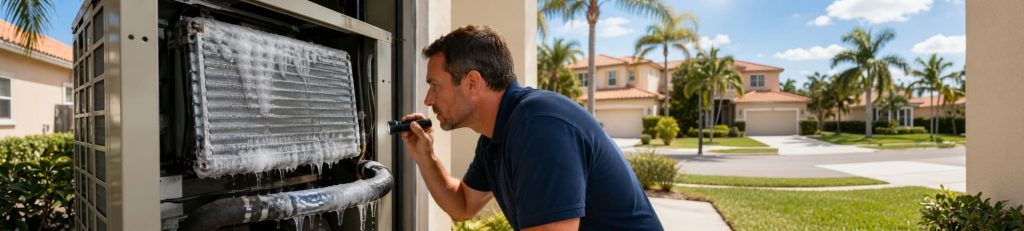
What Ice on an Air Conditioner Indicates
Ice on an indoor evaporator coil usually means that the coil is receiving too little warm air or that the refrigerant circuit is operating outside its intended conditions. The visible ice is a symptom rather than the underlying fault, so simply allowing it to melt does not complete the repair. If freezing returns after the coil thaws, see our AC repair service.
This guide concerns central split air conditioners and ducted heat pumps operating in cooling mode. Mini-split systems, packaged units and other refrigeration equipment can develop similar symptoms, but their controls, airflow paths and diagnostic procedures may differ.
Switch cooling off when ice is visible. Allow the system to thaw naturally, protect the surrounding area from water and avoid repeated restarts. Scraping the coil, applying direct heat or operating the compressor while airflow is restricted can cause additional damage.
This article describes icing of the indoor coil during cooling. Temporary frost on the outdoor coil of a heat pump during heating can occur before a normal defrost cycle. Persistent outdoor icing, however, can indicate a separate fault.
Immediate Steps When Ice Is Found
- Stop the cooling cycle. Set the thermostat or controller to Off and confirm that the outdoor compressor has stopped.
- Allow the system to thaw naturally. Do not use a heat gun, hair dryer, space heater, hot water, open flame or sharp tool. Excessive heat and physical force can damage fins, tubing, insulation and nearby electrical parts.
- Prepare for melting water. Move stored items away from the indoor unit or air-handling equipment. Where equipment is installed in an attic, roof space or elevated location, inspect the surfaces below for staining, dripping or wet building materials.
- Check only accessible airflow points. Look for a heavily loaded, wet or collapsed filter, blocked return openings and closed supply registers. Do not remove service panels from energized equipment.
- Wait until the coil is fully clear of ice. Airflow and refrigerant measurements taken while the evaporator is still frozen may be misleading.
Qualified inspection is needed if airflow stops, the equipment produces grinding or harsh buzzing sounds, water reaches electrical components, an electrical protective device trips repeatedly, or a burning odor is present.
Where Freeze-Up Usually Begins
During cooling, icing normally begins on the indoor evaporator coil. Depending on the system, the coil may be located inside an air-handling cabinet, above or beside a heating appliance, in a utility room, in a roof space or behind another access panel.
Because the evaporator is often hidden, frost on the larger insulated refrigerant line may be the first visible sign. In many split systems operating in cooling mode, this line carries low-pressure refrigerant vapor from the indoor coil toward the outdoor unit.
Ice visible near the outdoor equipment does not necessarily mean that the outdoor unit caused the fault. Low temperature and frost can extend along the refrigerant line from an already frozen indoor coil.
Visible signs
- White frost or solid ice on an insulated refrigerant line
- Ice around the indoor coil cabinet
- Water appearing after the cooling cycle stops
- Staining or dripping below elevated indoor equipment
Operating symptoms
- Weak airflow from several supply openings
- Long cooling cycles without adequate temperature reduction
- An outdoor unit running while little air reaches occupied rooms
- Cooling performance that declines as the cycle continues
Moisture on intact line insulation is not automatically evidence of freeze-up. A cold refrigerant line can collect condensation in humid air. White frost, hard ice or ice spreading onto the cabinet indicates a different condition.
How an Evaporator Coil Freezes
Warm return air normally flows across the evaporator and transfers heat to the refrigerant. Water vapor in the air condenses on the cold coil and drains away. Freeze-up begins when the coil surface remains below freezing long enough for this moisture to turn into ice.
Most causes fall into two broad groups:
- Insufficient airflow: too little warm indoor air crosses the evaporator because of a filter, duct, blower, coil or control problem.
- Abnormal refrigerant operation: refrigerant pressure, flow or charge causes part or all of the evaporator to become colder than intended.
Once ice forms, it narrows the air passages through the coil. Airflow falls further, heat transfer decreases and the frozen area can spread.
Airflow Problems That Can Cause Icing
The complete airflow path must be considered, from the return openings to the supply ducts. Replacing a dirty filter may improve airflow, but it does not rule out a blocked coil, blower fault, damaged duct or restrictive return system.
Restrictive or incorrectly installed filter
A heavily loaded, wet, collapsed, incorrectly sized or poorly fitted filter can reduce the air reaching the evaporator. A high-resistance filter can also create excessive pressure loss even when it appears clean, particularly if the system was not designed for it.
- Heavy dust accumulation
- Incorrect airflow direction
- A damaged or deformed filter
- More than one filter installed in an unsuitable configuration
- A filter resistance that exceeds the available blower capacity
Gaps around the filter create a different problem. Unfiltered air can carry dust onto the blower wheel and evaporator, gradually reducing airflow and heat transfer.
Restricted return or supply airflow
Return openings can be obstructed by furniture, curtains, stored objects or interior finishes. Within the duct system, crushed flexible duct, debris, closed dampers, disconnected sections or undersized passages can also limit airflow.
Closing several supply registers may increase system resistance and should not be used as the primary method for correcting substantial temperature differences between rooms.
Indoor blower faults
The blower must move the required volume of air whenever the evaporator is operating. Airflow may decrease because of a failed motor, contaminated or loose blower wheel, incorrect speed setting, damaged wiring, control failure or a motor that overheats and stops intermittently.
If the outdoor unit continues running while airflow from several indoor outlets becomes weak or stops, cooling should be switched off until the blower system is checked.
Contaminated evaporator coil
Dust can accumulate on the entering-air side of the coil when the filter does not fit correctly, the filter housing leaks or maintenance has been delayed. Deposits between the fins reduce heat transfer and narrow the passages through which air must move.
The visible surface may appear clean while contamination remains on a hidden face or deeper within the coil. High-pressure air, unsuitable chemicals and aggressive brushing can bend the fins or push debris farther into the assembly.
Refrigerant-Circuit Causes
Refrigerant is not normally consumed during operation. A confirmed low charge usually indicates a leak, an installation charging error or an incorrect previous service procedure. Ice alone, however, does not establish that the refrigerant charge is low because an airflow restriction can produce a similar symptom.
Possible refrigerant-side causes include:
- A refrigerant leak or incorrect charge
- A restricted expansion device or filter-drier
- A kinked, crushed or damaged refrigerant line
- Incorrectly matched indoor and outdoor components
- A metering-device or control fault
- Moisture, contamination or another internal restriction
Refrigerant performance should be evaluated only after the evaporator has thawed and adequate airflow has been confirmed. Pressures and line temperatures must be interpreted together with the refrigerant type, indoor conditions, outdoor temperature, equipment design and manufacturer data.
Depending on the system and the suspected fault, testing may include superheat, subcooling, temperature split, leak detection and comparison with specified operating data. A single pressure reading is not sufficient to identify the cause of freeze-up.
Adding refrigerant without confirming the charge can leave a leak or airflow restriction unresolved and may overcharge the system.
Control, Zoning and Installation Factors
Some freeze-ups begin after equipment replacement, duct modification, thermostat changes or zoning work alters airflow through the indoor coil.
- Cooling operation below the manufacturer-approved outdoor-temperature range without approved low-ambient controls
- Zoning dampers closing far enough to reduce airflow below the required level
- Incorrect thermostat, staging or blower-speed settings
- Improperly matched indoor and outdoor components
- A newly installed system operating without verified airflow
- Return ducts that are too restrictive for the installed equipment
- Recent changes to filters, ducts, zoning controls or indoor equipment
Open doors and windows increase the heat and moisture entering the building and may extend cooling cycles. They do not normally freeze a correctly operating evaporator by themselves, but longer operation can reveal an existing blower, duct, coil or refrigerant problem.
Hot weather has a similar effect. It increases runtime and cooling demand, but it does not independently create ice on a properly operating indoor coil.
Why Continued Operation Can Cause Damage
A frozen evaporator cannot absorb heat normally. Continued operation can lengthen compressor runtime, create abnormal refrigerant conditions and, in some faults, increase the risk of liquid refrigerant returning toward the compressor.
One freeze-up does not prove that the compressor has been damaged. The risk increases when the system continues operating with a heavily blocked coil or is restarted repeatedly without correcting the original fault.
Meltwater can also escape the normal drainage path. This is especially important where the indoor unit is installed above ceilings, finished rooms, electrical equipment or moisture-sensitive building materials.
What Thawing Can and Cannot Resolve
Thawing removes the ice and makes proper testing possible, but it does not determine why the evaporator became too cold. The following examples distinguish a visible improvement from a fault that may still remain.
| What appears to improve | What may remain unresolved | Possible result |
|---|---|---|
| The exposed refrigerant line is no longer covered in ice | Ice remains deeper within the evaporator | Airflow stays restricted and icing returns |
| A dirty or collapsed filter has been replaced | The blower, coil, return system or ductwork is also restricted | Cooling remains weak or the evaporator freezes again |
| The system initially produces cool air | A leak, incorrect charge or refrigerant restriction remains | Cooling capacity declines during a longer cycle |
| Water stops after the ice has melted | The drain is restricted, the pan is damaged or the drain slope is incorrect | Leakage returns during normal condensation or another thaw |
Drainage defects do not normally cause the evaporator to freeze, but they can significantly increase water damage when accumulated ice melts. A substantial freeze-up may require inspection of the drain line, pan, slope, cabinet insulation and overflow protection.
How the Cause Is Diagnosed
Diagnosis begins after the evaporator has completely thawed. Testing refrigerant performance while ice is blocking the coil can produce inaccurate airflow, temperature and pressure readings.
- Inspect for remaining ice and water. Examine the evaporator area, cabinet, drain pan, insulation and nearby surfaces.
- Review the airflow path. Check filter condition and fit, return openings, supply registers, accessible dampers and visible duct damage.
- Evaluate the indoor blower. Confirm that the motor, wheel, controls and speed settings are producing the airflow required by the equipment.
- Measure airflow resistance where appropriate. Static-pressure and temperature measurements can help identify a restrictive filter, contaminated coil, duct problem or blower fault.
- Inspect the evaporator and condensate system. Look for contamination, damaged fins, drain blockage, incorrect slope, pan damage and displaced insulation.
- Test the refrigerant circuit. After airflow is verified, compare pressures and temperatures with the equipment specifications and current operating conditions.
The exact sequence depends on the equipment design and the evidence found during inspection. Measurements should be interpreted together rather than treated as isolated pass-or-fail values.
When Prompt Technical Assessment Is Necessary
Keep the system off and arrange qualified assessment when:
- Water is escaping from elevated or concealed indoor equipment
- Water is reaching drywall, insulation, flooring or electrical components
- The indoor blower is not moving air
- The equipment produces grinding, harsh buzzing or repeated clicking
- A circuit breaker, fuse or other protective device operates repeatedly
- There is a burning or electrical odor
- Indoor temperatures are becoming unsafe
- People in the building are particularly vulnerable to heat
Smoke, sparks or fire require immediate disconnection where this can be done safely and contact with the appropriate emergency services.
Reducing the Risk of Repeated Freeze-Up
- Use the correct filter dimensions and a resistance level suitable for the system.
- Replace filters that are loaded, wet, damaged or deformed.
- Keep supply and return openings unobstructed.
- Avoid closing multiple registers to control room temperature.
- Investigate weakening airflow before visible ice appears.
- Seal filter-housing gaps that allow dust to bypass the filter.
- Repair crushed, disconnected or restrictive duct sections.
- Clean contaminated coils and blower wheels using suitable methods.
- Identify the reason for a low refrigerant charge instead of repeatedly adding refrigerant.
- Inspect drainage and overflow protection after a major freeze-up.
- Verify airflow after equipment, control, filter or zoning changes.
If icing returns after the coil has thawed, the underlying airflow, control or refrigerant problem has not been resolved.
Frequently Asked Questions
Is moisture on an insulated refrigerant line always a fault?
No. Condensation can form on a cold line in humid air. White frost, hard ice, damaged insulation or ice spreading toward the indoor cabinet requires further investigation.
Can high indoor humidity freeze the evaporator?
High humidity increases the amount of moisture available to freeze, but it does not normally lower the coil temperature by itself. An airflow, control or refrigerant problem must first make the evaporator colder than intended.
Can a dirty filter be the only cause?
Yes, a severely restricted filter can reduce airflow enough to cause icing. However, a filter problem may exist together with a contaminated coil, blower fault, blocked return or restrictive duct system.
Does ice always mean that refrigerant is low?
No. Low refrigerant charge is one possible cause, but insufficient airflow can create a similar symptom. Refrigerant charge should be evaluated only after normal airflow has been confirmed.
Can the system be restarted after the ice melts?
The system should not return to regular operation until the cause has been identified or the accessible airflow problem has been corrected and normal operation has been verified. Repeated thawing and restarting can allow the fault to worsen.
Further Technical Reading
The following source provides a general technical overview from a United States government energy-efficiency program. It is included for its explanation of common air-conditioner faults rather than as a universal regulatory standard.
- U.S. Department of Energy, general technical overview of common air-conditioner problems: https://www.energy.gov/energysaver/common-air-conditioner-problems